[et_pb_section fb_built=”1″ _builder_version=”4.9.4″ _module_preset=”default”][et_pb_row _builder_version=”4.9.4″ _module_preset=”default”][et_pb_column type=”4_4″ _builder_version=”4.9.4″ _module_preset=”default”][et_pb_text _builder_version=”4.9.4″ _module_preset=”default” hover_enabled=”0″ sticky_enabled=”0″]
This week in the Studio
(more accurately known as my office / sewing room / fabric closet)
I didn’t get much time stitching this week as much of creative time was spent on writing and design work, also rewarding but not those are stories for another post; today is about fabric finishes. So, while I was not too productive with the sewing, I did get a couple of fun little projects finished plus another piece advanced to the next level.
[/et_pb_text][/et_pb_column][/et_pb_row][et_pb_row column_structure=”1_2,1_2″ _builder_version=”4.9.4″ _module_preset=”default” hover_enabled=”0″ sticky_enabled=”0″][et_pb_column type=”1_2″ _builder_version=”4.9.4″ _module_preset=”default”][et_pb_text _builder_version=”4.9.4″ _module_preset=”default” hover_enabled=”0″ sticky_enabled=”0″]
Square-bottom bag
My husband, who is a talented woodworker, was asked to make two urns for cremated remains of a pet. He asked me to make liner bags for them. When I looked up what type of bags would be in an urn, I learned that they are called cremains bags and there are actually quite a few options available. But I could not find a square bottom bag, which is what we were thinking of doing.
It actually turned out to be a little more challenging than I expected. I have made square fabric boxes, and box-bottom drawstring bags but not a square bottomed drawstring bag, which actually turned out a little tricky. I made a couple of prototypes – one a cotton made the traditional way with a boxed base. But because of the small size* it was hard to make a square base that looked neat inside as I wanted. I called on my days of making paper box photo albums and made a cross pattern with a square centre. It worked out ok but I decided to make bigger seams so I could give them a nicer finish by pressing them open before I turned the top.
I revised the pattern and made the two new bags from the new pattern. The I was pretty happy with the results and so was my husband. More importantly, when he delivered the products he reported that his colleague was ‘over the moon’ about both the boxes and the bags, which we threw in as an added touch.
[/et_pb_text][/et_pb_column][et_pb_column type=”1_2″ _builder_version=”4.9.4″ _module_preset=”default”][et_pb_image src=”https://www.keepthestories.ca/wp-content/uploads/2021/08/cremains-bag-4in-bottom-Aug-2021-3-600px.jpeg” _builder_version=”4.9.4″ _module_preset=”default” title_text=”cremains bag 4in bottom Aug 2021 (3) 600px” hover_enabled=”0″ sticky_enabled=”0″][/et_pb_image][/et_pb_column][/et_pb_row][et_pb_row _builder_version=”4.9.4″ _module_preset=”default”][et_pb_column _builder_version=”4.9.4″ _module_preset=”default” type=”4_4″][et_pb_text _builder_version=”4.9.4″ _module_preset=”default” hover_enabled=”0″ sticky_enabled=”0″]
* If you have had a pet, you might realize that a 4 1/2″ square box is a smaller than is typical – in fact, about half the size. We were curious about that, as you might have been. Turns out, that the owners are no longer together but have decided to spread some ashes in favourite places for them and their beloved dog – and then divide the remainder so that they can each have a decorative resting place. That is a unique request for us. Working people directly to help them meet their needs is definitely one of the most interesting and rewarding parts about doing custom work.
[/et_pb_text][/et_pb_column][/et_pb_row][et_pb_row _builder_version=”4.9.4″ _module_preset=”default” column_structure=”1_4,1_4,1_4,1_4″][et_pb_column _builder_version=”4.9.4″ _module_preset=”default” type=”1_4″][et_pb_image src=”https://www.keepthestories.ca/wp-content/uploads/2021/08/cremains-bag-4in-bottom-Aug-2021-5-600px.jpeg” _builder_version=”4.9.4″ _module_preset=”default” title_text=”cremains bag 4in bottom Aug 2021 (5) 600px” hover_enabled=”0″ sticky_enabled=”0″][/et_pb_image][et_pb_text _builder_version=”4.9.4″ _module_preset=”default” hover_enabled=”0″ sticky_enabled=”0″]
Prototype boxes before I made one out of the final piece out of a satin / ultrasuede scrap.
[/et_pb_text][/et_pb_column][et_pb_column _builder_version=”4.9.4″ _module_preset=”default” type=”1_4″][et_pb_image src=”https://www.keepthestories.ca/wp-content/uploads/2021/08/cremains-bag-4in-bottom-Aug-2021-1-600px.jpeg” _builder_version=”4.9.4″ _module_preset=”default” title_text=”cremains bag 4in bottom Aug 2021 (1) 600px” hover_enabled=”0″ sticky_enabled=”0″][/et_pb_image][/et_pb_column][et_pb_column _builder_version=”4.9.4″ _module_preset=”default” type=”1_4″][et_pb_image src=”https://www.keepthestories.ca/wp-content/uploads/2021/08/cremains-bag-4in-bottom-Aug-2021-2-600px.jpeg” _builder_version=”4.9.4″ _module_preset=”default” title_text=”cremains bag 4in bottom Aug 2021 (2) 600px” hover_enabled=”0″ sticky_enabled=”0″][/et_pb_image][/et_pb_column][et_pb_column _builder_version=”4.9.4″ _module_preset=”default” type=”1_4″][et_pb_image src=”https://www.keepthestories.ca/wp-content/uploads/2021/08/cremains-bag-4in-bottom-Aug-2021-4-600px.jpeg” _builder_version=”4.9.4″ _module_preset=”default” title_text=”cremains bag 4in bottom Aug 2021 (4) 600px” hover_enabled=”0″ sticky_enabled=”0″][/et_pb_image][/et_pb_column][/et_pb_row][et_pb_row _builder_version=”4.9.4″ _module_preset=”default” column_structure=”1_4,1_4,1_4,1_4″][et_pb_column _builder_version=”4.9.4″ _module_preset=”default” type=”1_4″][et_pb_text _builder_version=”4.9.4″ _module_preset=”default” hover_enabled=”0″ sticky_enabled=”0″][/et_pb_text][/et_pb_column][et_pb_column _builder_version=”4.9.4″ _module_preset=”default” type=”1_4″][et_pb_text _builder_version=”4.9.4″ _module_preset=”default” hover_enabled=”0″ sticky_enabled=”0″]
Freezer paper template ironed on to my fabric scrap. I wanted fabric that would look classic. This is a piece I bought in a scrap bag from a small boutique clothing maker. Just enough for two small bags.
[/et_pb_text][/et_pb_column][et_pb_column _builder_version=”4.9.4″ _module_preset=”default” type=”1_4″][et_pb_text _builder_version=”4.9.4″ _module_preset=”default” hover_enabled=”0″ sticky_enabled=”0″]
I always write descriptions on the templates so I can remember the project – and reuse them. This pattern will work well for a lovely small gift bag, and will be a perfect way to package some of our small boxes.
[/et_pb_text][/et_pb_column][et_pb_column _builder_version=”4.9.4″ _module_preset=”default” type=”1_4″][et_pb_text _builder_version=”4.9.4″ _module_preset=”default” hover_enabled=”0″ sticky_enabled=”0″]
I zig-zagged around the pattern before stitching the sides together and turning for a drawstring. This will prevent unravelling (the bag will be unlined) and gives it a more finished look.
[/et_pb_text][/et_pb_column][/et_pb_row][et_pb_row _builder_version=”4.9.4″ _module_preset=”default”][et_pb_column _builder_version=”4.9.4″ _module_preset=”default” type=”4_4″][et_pb_text _builder_version=”4.9.4″ _module_preset=”default” hover_enabled=”0″ sticky_enabled=”0″]
Fabric Twine Coasters and Trivet
My favourite material is scraps and offcuts and I try to use if the smallest bits. Because friends know this, sometimes I will find bags of scraps on my back steps. Sorting and reclaiming some those bags has become quite a process. That might also be a story for another day.
Thin pieces usually find their way into fabric twine. I will use any piece at least about 7″ long and usually between 3/4″ and 1″ wide. Twisting them into fabric twine is a great TV watching activity as it requires no attention, can be done with low light (so as not to disturb someone else in the room or prefers to have the low while watching a movie), and does not require space or moving about (should you have a cat sleeping contentedly on your lap). If you want to try it, you can find lots of tutorials online to suit your style.
Usually, once I get a bit of a ball, I measure it, and wind it on cardboard (I use fabric boards that I rescued, with permission, from the fabric store recycle bin). This twine makes perfect – and very colourful – drawstring for gift bags. This week, I made some other simple projects to throw into a small gift basket when we learned in the morning that one of our brunch guests was celebrating a birthday.
[/et_pb_text][/et_pb_column][/et_pb_row][et_pb_row _builder_version=”4.9.4″ _module_preset=”default” column_structure=”1_3,1_3,1_3″][et_pb_column _builder_version=”4.9.4″ _module_preset=”default” type=”1_3″][et_pb_image src=”https://www.keepthestories.ca/wp-content/uploads/2021/08/Fabric-twine-coaster-trivet-Aug-2021-1.jpeg” _builder_version=”4.9.4″ _module_preset=”default” title_text=”Fabric twine coaster trivet Aug 2021 (1)” hover_enabled=”0″ sticky_enabled=”0″][/et_pb_image][/et_pb_column][et_pb_column _builder_version=”4.9.4″ _module_preset=”default” type=”1_3″][et_pb_image src=”https://www.keepthestories.ca/wp-content/uploads/2021/08/Fabric-twine-coaster-trivet-Aug-2021-2.jpeg” _builder_version=”4.9.4″ _module_preset=”default” title_text=”Fabric twine coaster trivet Aug 2021 (2)” hover_enabled=”0″ sticky_enabled=”0″][/et_pb_image][/et_pb_column][et_pb_column _builder_version=”4.9.4″ _module_preset=”default” type=”1_3″][et_pb_image src=”https://www.keepthestories.ca/wp-content/uploads/2021/08/Fabric-twine-coaster-trivet-Aug-2021-3.jpeg” _builder_version=”4.9.4″ _module_preset=”default” title_text=”Fabric twine coaster trivet Aug 2021 (3)” hover_enabled=”0″ sticky_enabled=”0″][/et_pb_image][/et_pb_column][/et_pb_row][et_pb_row _builder_version=”4.9.4″ _module_preset=”default” column_structure=”1_3,1_3,1_3″][et_pb_column _builder_version=”4.9.4″ _module_preset=”default” type=”1_3″][et_pb_text _builder_version=”4.9.4″ _module_preset=”default” hover_enabled=”0″ sticky_enabled=”0″]
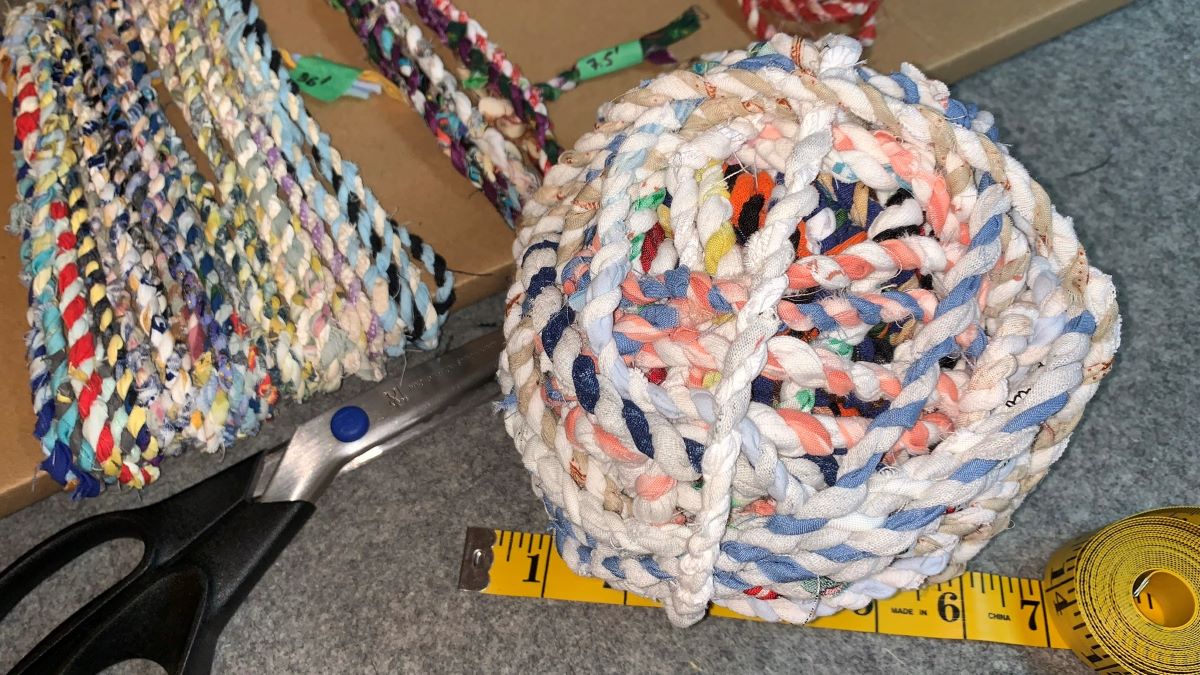
Showing how the twine looks when twisted and stored. Scissors are the only necessary tool and not always required.
[/et_pb_text][/et_pb_column][et_pb_column _builder_version=”4.9.4″ _module_preset=”default” type=”1_3″][et_pb_text _builder_version=”4.9.4″ _module_preset=”default” hover_enabled=”0″ sticky_enabled=”0″]
The round trivet with multi-coloured twine. This is what I usually do. I put suitable scraps in a box by the sofa and just grab whatever is next. It is about 7″ diameter and took about 18 feet of twine – it doesn’t take long to make that much.
For the coasters, I used scraps from placemats that I had made for the same person (actually made 4 to go with their set). You can see it looks quite different when you limit the colours. These took about 7′ each.
[/et_pb_text][/et_pb_column][et_pb_column _builder_version=”4.9.4″ _module_preset=”default” type=”1_3″][et_pb_text _builder_version=”4.9.4″ _module_preset=”default” hover_enabled=”0″ sticky_enabled=”0″]
Just to give you a sense of size and use.
We put these items together in a fabric basket with some homemade bread and preserves and ta-da, last minute birthday gift.
[/et_pb_text][/et_pb_column][/et_pb_row][et_pb_row _builder_version=”4.9.4″ _module_preset=”default”][et_pb_column type=”4_4″ _builder_version=”4.9.4″ _module_preset=”default”][et_pb_text _builder_version=”4.9.4″ _module_preset=”default” custom_padding=”||1px|||” hover_enabled=”0″ sticky_enabled=”0″]
Fabric Portrait
Several years ago, I participated in a workshop on creating fabric portraits. The instructor encouraged us to try fabrics with small patterns, maybe more than we might be inclined to chose. This is something that I love to do on photo-based landscape quilts but I found it much more of a leap with a portrait. The challenge is to add texture and subtle colour variations without making it look like a skin condition or blemish that the person does not have.
When I take a class, I always try to apply the suggestions and challenges the instructor makes, even if it goes against my instincts. Others will immediately identify some of the presented ideas as possibly interesting but not for them. I prefer to think of it as a chance to experiment and remind myself that I am taking a class to learn new approaches and what better time than on the test class project
This was my first foray into portrait a quilt, which is an area that I would like to develop more. It decided this week, it would be a good time to go back to this project and look at it as a learning experience. I have never really been happy with the results and have often debated with myself about ‘fixing it’ and choosing different fabrics. I have decided that a) I haven’t taken it far enough to really judge it and b) if I am not satisfied at the end, I can always use the same picture to make another version.
Before describing the steps, I will add that I have always been reluctant to share art quilts at this stage because they can tend to look nothing like the inspiration photo. I have learned, it is not until the thread work is added that it really starts to take shape because because blending the thread softens and merges the edges. I am starting to show more of the processes because I have good feedback about doing this in person but it is a tough step. Hopefully, you will be interested in seeing the progress and the finished piece emerges.
[/et_pb_text][/et_pb_column][/et_pb_row][et_pb_row _builder_version=”4.9.4″ _module_preset=”default” column_structure=”1_3,1_3,1_3″][et_pb_column _builder_version=”4.9.4″ _module_preset=”default” type=”1_3″][et_pb_image src=”https://www.keepthestories.ca/wp-content/uploads/2021/08/fabricportrait-Dad-Aug-2021-1.jpeg” _builder_version=”4.9.4″ _module_preset=”default” title_text=”fabricportrait Dad Aug 2021 (1)” hover_enabled=”0″ sticky_enabled=”0″][/et_pb_image][et_pb_text _builder_version=”4.9.4″ _module_preset=”default” hover_enabled=”0″ sticky_enabled=”0″]
With some of the fabrics stitched in place with matching fabrics. The trick at this stage is to look at it from a distance or in a mirror. Or on the screen, it sometimes helps to squint a little or close one eye to see the shapes blend more.
[/et_pb_text][/et_pb_column][et_pb_column _builder_version=”4.9.4″ _module_preset=”default” type=”1_3″][et_pb_image src=”https://www.keepthestories.ca/wp-content/uploads/2021/08/fabricportrait-Dad-Aug-2021-2.jpeg” _builder_version=”4.9.4″ _module_preset=”default” title_text=”fabricportrait Dad Aug 2021 (2)” hover_enabled=”0″ sticky_enabled=”0″][/et_pb_image][et_pb_text _builder_version=”4.9.4″ _module_preset=”default” hover_enabled=”0″ sticky_enabled=”0″]
When making a textile piece based on a picture, one of the strategies you need to learn is to trust the picture and not what you think you should see. You don’t want to make things up. For example here, one eye looks bigger than the other in the fabric picture but when you look at the source picture, you can see that is consistent because of the angle of the eyelids. Looking at it with only value and not colour can make some things clearer.
[/et_pb_text][/et_pb_column][et_pb_column _builder_version=”4.9.4″ _module_preset=”default” type=”1_3″][et_pb_image src=”https://www.keepthestories.ca/wp-content/uploads/2021/08/fabricportrait-Dad-Aug-2021-3.jpeg” _builder_version=”4.9.4″ _module_preset=”default” title_text=”fabricportrait Dad Aug 2021 (3)” hover_enabled=”0″ sticky_enabled=”0″][/et_pb_image][et_pb_text _builder_version=”4.9.4″ _module_preset=”default” hover_enabled=”0″ sticky_enabled=”0″]
Starting thread selection for the next step.
[/et_pb_text][/et_pb_column][/et_pb_row][et_pb_row _builder_version=”4.9.4″ _module_preset=”default”][et_pb_column _builder_version=”4.9.4″ _module_preset=”default” type=”4_4″][et_pb_text _builder_version=”4.9.4″ _module_preset=”default” hover_enabled=”0″ sticky_enabled=”0″]
As you might be able to tell, I’ve started doing the initial tacking down with matching threads, and will finish that stage today. Then, I expect that I will put this aside for a week or two because of deadlines. However, I will be keeping it pinned on my inspiration board rather than putting it back on the shelf of projects, where some go to languish or die.
Watch for updates soon.
[/et_pb_text][/et_pb_column][/et_pb_row][/et_pb_section]